


The practical goal of image optimization is not “the smallest file” or “the highest slider value.” It is the smallest delivery file that remains visually and functionally acceptable for a defined use: the right dimensions, enough detail, correct transparency and color, and a format the destination will actually preserve.
Last reviewed: August 13, 2026. Format facts were checked against W3C, Google, AOMedia and MDN documentation. Original measurements use the published WebP to PNG Synthetic Benchmark v1.0; all numerical conclusions are limited to its documented corpus and reference pipeline.
A repeatable quality-versus-size workflow
- Define the display job. Record the largest rendered dimensions, expected pixel density, transparency requirement, color requirement and target apps or browsers.
- Prepare a clean master. Keep the layered, camera or high-precision source outside the delivery pipeline.
- Resize before compressing. Remove pixels the destination will never display.
- Export representative candidates. Use documented formats and settings rather than relying on “low,” “medium” or “high” labels.
- Inspect the candidates. Check them at intended size, at high zoom, on light and dark backgrounds, and on a second display if color matters.
- Measure the final bytes. Include the metadata and profiles that will actually ship.
- Choose the lowest-cost acceptable candidate. Save the settings and test files so the decision can be repeated.
This process is slower than repeating a rule such as “quality 80 is enough,” but it avoids a costly mistake: quality numbers are encoder controls, not standardized visual grades. A WebP Q80, JPEG quality 80 and AVIF quality 80 are not equivalent, and two encoders for the same format can produce different results.
Start with dimensions, not compression
Pixel dimensions often dominate the optimization opportunity. An image exported at 3000×2000 contains six million pixels. If it is never displayed above 1200×800, the larger version carries 6.25 times as many pixels before any format or encoder decision. CSS can scale the image visually, but it does not automatically remove the original download and decode work.
Prepare variants that match real layout breakpoints and use responsive image markup where appropriate. Do not downsize the only master. A print, retina, zoom or future redesign requirement may need more pixels than today’s delivery asset.
What “quality” can mean
Quality is not one measurement. It can refer to at least four different things:
- Sample fidelity: whether decoded channel values match a reference.
- Perceived visual quality: whether a person notices or cares about the differences in context.
- Functional fidelity: whether text, transparency, brand colors, line edges or scientific detail still perform their job.
- Workflow fidelity: whether profiles, metadata, bit depth, orientation and animation survive the complete tool chain.
A pixel-perfect conversion can still be unsuitable if it strips a required ICC profile. A visually acceptable photo can still fail if the upload system does not accept the format. A high PSNR can coexist with a locally obvious artifact. State which kind of quality you measured.
PSNR, SSIM and visual inspection
Peak signal-to-noise ratio (PSNR) summarizes numeric error relative to a reference, usually in decibels. Structural similarity (SSIM) compares luminance, contrast and structure. Both can help compare controlled encodes, but neither is a universal perception score. Cropping, rescaling, color transforms and alpha compositing can also make a metric comparison invalid unless the procedure is documented.
Use metrics to organize candidates, then inspect the actual task. For photographs, look at faces, hair, foliage, fabric and low-contrast texture. For UI and line art, inspect one-pixel edges, small type and high-contrast corners. For gradients, look for banding. For transparent assets, composite against both light and dark colors and inspect the fringe.
Original test: quality setting, measured error and output size
Our synthetic benchmark generated 80 deterministic RGBA images in five categories—flat UI, line art, gradients, soft transparency and photo-like texture—at exactly 512×512 and 1280×720. Each source was encoded as lossless WebP and lossy WebP at quality settings 50, 80 and 95 using method 6. Pillow 12.2.0 and libwebp 1.6.0 were used throughout.
For lossy modes, the source and decoded WebP were composited over neutral gray before mean squared error, mean absolute error and PSNR were calculated. Alpha was measured separately. That choice avoids treating invisible RGB under alpha zero as visible damage, but it represents only one neutral background and one metric setup.
| WebP mode | Cases | Median source PSNR | Median WebP size | Median converted PNG size |
|---|---|---|---|---|
| Lossless exact | 80 | Exact visible source in this pipeline | 70.1 KiB | 127.1 KiB |
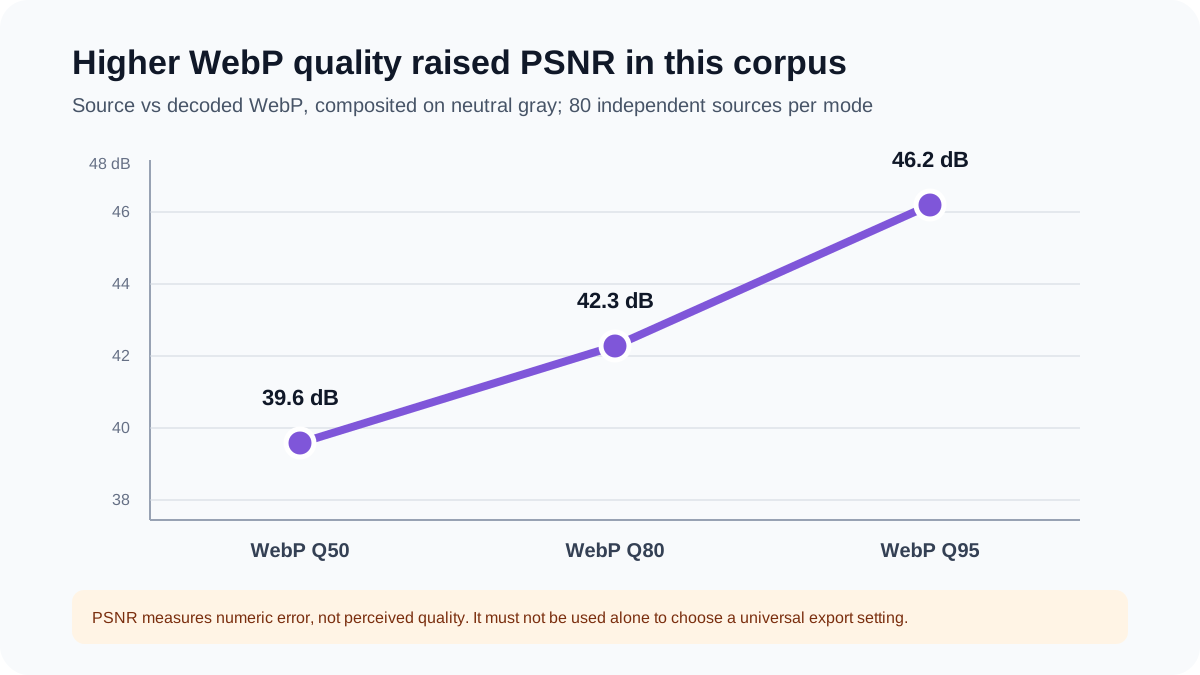
| Lossy Q50 | 80 | 39.6 dB | 25.6 KiB | 342.2 KiB |
| Lossy Q80 | 80 | 42.3 dB | 30.0 KiB | 306.7 KiB |
| Lossy Q95 | 80 | 46.2 dB | 45.0 KiB | 329.9 KiB |
Two findings are defensible within the corpus. First, higher WebP quality settings produced higher median PSNR, with larger median WebP files. Second, writing the already decoded WebP pixels as a fixed PNG made the files larger in every tested case. The median PNG-to-WebP ratio was 11.20× for Q50, 7.55× for Q80 and 4.54× for Q95.
The apparently smaller median PNG at Q80 than at Q50 is a useful warning: file size after conversion depends on the decoded pixel patterns, not just the source WebP’s quality label. Lossy artifacts can change how well PNG’s lossless filters and Deflate compression work. These aggregates must not be turned into a rule that Q80 always creates smaller PNGs than Q50.
See the complete methodology and validation report. The study excludes animated WebP, metadata, ICC/EXIF/XMP handling, malformed files, extreme dimensions and browser UI time. It is not a probability sample of images on the web.
Use the correct format capabilities
Format choice limits what can be preserved. The PNG specification permits 8- or 16-bit samples for truecolor and truecolor-with-alpha images. WebP’s documented RGBA channels are 8-bit. It is therefore inaccurate to describe ordinary WebP as a 10-bit-plus format like high-bit-depth PNG or AVIF.
AOMedia’s current AVIF specification page describes lossless and lossy compression, HDR, wide color gamut, transparency and animation. Those features make AVIF a candidate for tested modern delivery, not an automatic winner. Encoder effort, decode support, source content and the destination still determine the result. Avoid unsupported claims such as “AVIF is always 2% of PNG size.”
| Requirement | Suitable starting candidates | What to verify |
|---|---|---|
| Photo, no alpha | WebP, JPEG, AVIF | Texture, faces, gradients, destination support and decode behavior |
| Crisp UI or diagram | Lossless WebP, PNG, SVG when truly vector | Small text, one-pixel edges, color count and actual bytes |
| Soft transparency | WebP, PNG, AVIF | Alpha fringe over light/dark backgrounds and precision needs |
| 16-bit raster editing | 16-bit PNG or another suitable master format | End-to-end bit depth, profile preservation and editor support |
| Animation | WebP, APNG, AVIF; GIF only when required | Frame timing, looping, alpha, platform processing and fallback |
A practical candidate test
Create a small test sheet before exporting an entire library. Use at least one difficult crop from each content class in the project. Name files with the encoder, version, dimensions, format and setting—for example, hero-1600w-webp-libwebp-q80.webp. Keep a CSV with these fields:
- source identifier and checksum;
- output dimensions and byte size;
- encoder and version;
- quality, lossless and effort settings;
- alpha, bit depth, profile and metadata decisions;
- metric result, if used;
- reviewer, display context and pass/fail notes.
Review candidates blind if the decision is important: hide filenames and settings so expectations do not influence the first visual judgment. Then reveal size and configuration. The chosen setting should be the one that passes the defined task, not necessarily the one with the highest metric.
Transparency and color need separate checks
For transparent assets, compare alpha separately from RGB. A converter may keep the visible shape while changing RGB values under fully transparent pixels, or it may preserve RGB while flattening alpha. Our benchmark found exact decoded alpha and pixel-identical WebP-to-PNG output in all 320 cases, but that conclusion applies only to its pipeline and test set. The detailed procedure is explained in the alpha-channel guide.
Color appearance can shift even when channel values appear similar. Check ICC-profile behavior, transfer functions and the destination’s color management. The PNG and WebP formats can carry color information, but a particular converter or platform may strip or ignore it. The benchmark did not test profile transfer, so it cannot support a claim of color-managed equivalence.
When WebP-to-PNG conversion helps—and when it does not
Converting to PNG is useful when the destination requires PNG, when you need a lossless static copy of the currently decoded image, or when a transparent WebP must enter a PNG-based editing workflow. It does not improve a lossy WebP, restore discarded texture, add genuine 16-bit precision or guarantee metadata retention. The output will often be larger because PNG is storing the decoded pixels losslessly.
The WEBP to PNG converter processes supported files in the browser, with up to 20 files per batch and a 50 MB limit per file. Keep the source, inspect the PNG, and use a color-managed desktop workflow for archival or print-critical material.
Quality-versus-size checklist
- Are the pixel dimensions appropriate for the rendered size?
- Is the source master preserved?
- Does the format support the required alpha, animation and bit depth?
- Were encoder name, version and settings recorded?
- Were difficult details inspected at actual size and zoomed?
- Were transparent edges tested on contrasting backgrounds?
- Were profiles and metadata tested separately?
- Was the final destination tested for recompression or flattening?
- Are conclusions limited to the files and conditions actually measured?
For a concise format-selection view, read PNG vs WebP vs JPEG. For animated assets, use the dedicated WebP vs APNG vs GIF workflow rather than applying still-image quality rules to a sequence.
How to run a fair visual review
Place candidates in the same viewer at the same rendered dimensions. Disable accidental rescaling differences, use a neutral page background for opaque photos, and use multiple backgrounds for alpha assets. Randomize filenames or present the files in a blind order. Review first at normal viewing distance, then zoom in to identify the artifact responsible for any failure.
Define acceptance language before looking at file sizes. For example: “no visible ringing around 14-pixel interface text at 100%,” “no new banding in the sky on the reference display,” or “transparent edge passes on white, black and brand blue.” These criteria are more actionable than “looks good.” Record a pass, conditional pass or fail for each criterion.
Only reveal bytes and settings after the initial visual result. If two candidates pass, choose the smaller one or the one with the safer compatibility profile. If none passes, change dimensions, format, chroma subsampling, quality or encoder effort and run a new named round. Do not silently replace a failed candidate and keep the old measurements.
Archive the source crop and chosen derivative with checksums. This turns a subjective one-time judgment into an auditable editorial decision and makes future encoder upgrades testable. A later tool version should be compared against the same difficult crops, not a new set selected after seeing the result.